Creating a New Project
A project is the container or workspace where you can develop and manage your applications. You can set up Full-Stack or Backend-Only project.
Overview
A project is where you:
- Access your applications: Define your data models, create business logic, and design user interfaces within the project.
- Define your data: Set structures, relationships, and access control rules within your project. You can manage and interact with your data through the project's data management capabilities.
- Set user access: Define user roles and permissions for your applications.
- Deploy serverless functions: Create and deploy serverless functions that run within your project, allowing you to add custom server-side logic to your applications.
- Define API endpoints: Define and expose API endpoints for your applications, making it easy to integrate with external services or create custom APIs.
- Control authentication and authorization: Projects offer built-in authentication and authorization features to secure your applications.
- Deploy and host applications: Publish your applications and make them available to users.
For more information about projects, see Projects.
Creating a Project
After you log in, the My Projects page loads and displays a list of all your projects. This page will be blank if you have not created any projects.

Before creating your first project, you should set up your payment details. Otherwise, you will be prompted during the project creation process.
To create a new project:
- Click Create Project in the upper left corner of the My Projects page.
- A dialog box opens.
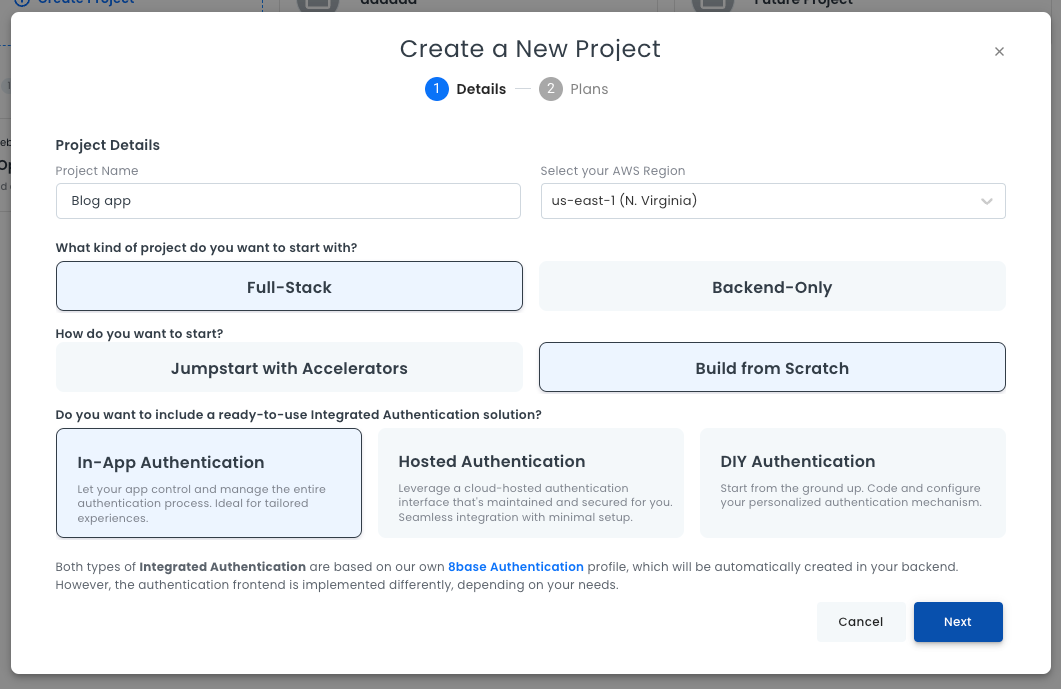
- Enter a unique name for your project.
- Choose your AWS region, either East or West. It is a best practice to choose a region that is geographically close to your users. This reduces latency, because data reaches the users more quickly.
- Choose a project type:
- Jumpstart with Accelerators: Your project will have pre-built services and components such as authentication, user management, and notifications.
- Build from Scratch: Your project will be empty.
- If you choose Build from Scratch, you need to select an authentication method:
- In-App Authentication: Your application will control and manage the entire authentication process. This option is ideal for tailored experiences.
- Hosted Authentication: Your application will have a cloud-hosted authentication interface, maintained and secured by 8base.
- DIY Authentication: You will design your authentication process from the ground up. You can also choose to have no authentication.
- Click Next.
- Choose your payment plan. Once you select a payment plan, a dialog box opens, showing project creation progress.

Once your project is created the dialog box closes and you are redirected to your project dashboard. Click Start Building to close the pop-up. You can now begin working on your new project.

To learn about the Project Dashboard interface, see Project Dashboard Walkthrough.